MCP Quickstart
This guide will help you set up the Zenable MCP Server in your local IDE (Cursor or Windsurf).
End-user installation
First you’ll need an API Key from us to use the MCP server.
Visit our get started page, fill out the sign up form, and you’ll receive your key.
Next, you’ll update your editor / IDE / LLM client to connect to the Zenable MCP server’s endpoint.
Ensure npx is installed and available
npx is used to facilitate the Zenable MCP integration. If you don’t already have npx installed, follow the instructions below for your platform:
Check if npx is installed:
If you see a version number, you’re all set! If you see an error, install Node.js (which includes npm and npx) using Homebrew:
Or download the installer from the official Node.js site.
Verify npx is in your PATH:
The output should be a path like /usr/local/bin/npx.
Check if npx is installed:
If you see a version number, you’re all set! If you see an error, install Node.js (which includes npm and npx) using Homebrew:
Or download the installer from the official Node.js site.
Verify npx is in your PATH:
The output should be a path like /usr/local/bin/npx.
Check if npx is installed:
If you see a version number, you’re all set! If not, install Node.js (which includes npm and npx):
Or use a Node version manager like nvm:
See the npm docs for more details.
Verify npx is in your PATH:
The output should be a path like /usr/bin/npx.
Check if npx is installed:
Open Command Prompt or PowerShell and run:
If you see a version number, you’re all set! If not, download and install Node.js from the official Node.js site. This will install npm and npx as well.
Verify npx is in your PATH:
The output should be a path like C:\Program Files\nodejs\npx.cmd.
For more information, see the npm documentation.
Add this entry to your global ~/.kiro/settings/mcp.json or per-project .kiro/settings/mcp.json configuration file as described in the Kiro
documentation:
Next, add an agent hook by opening the Kiro hook UI and then entering the following into the text area:
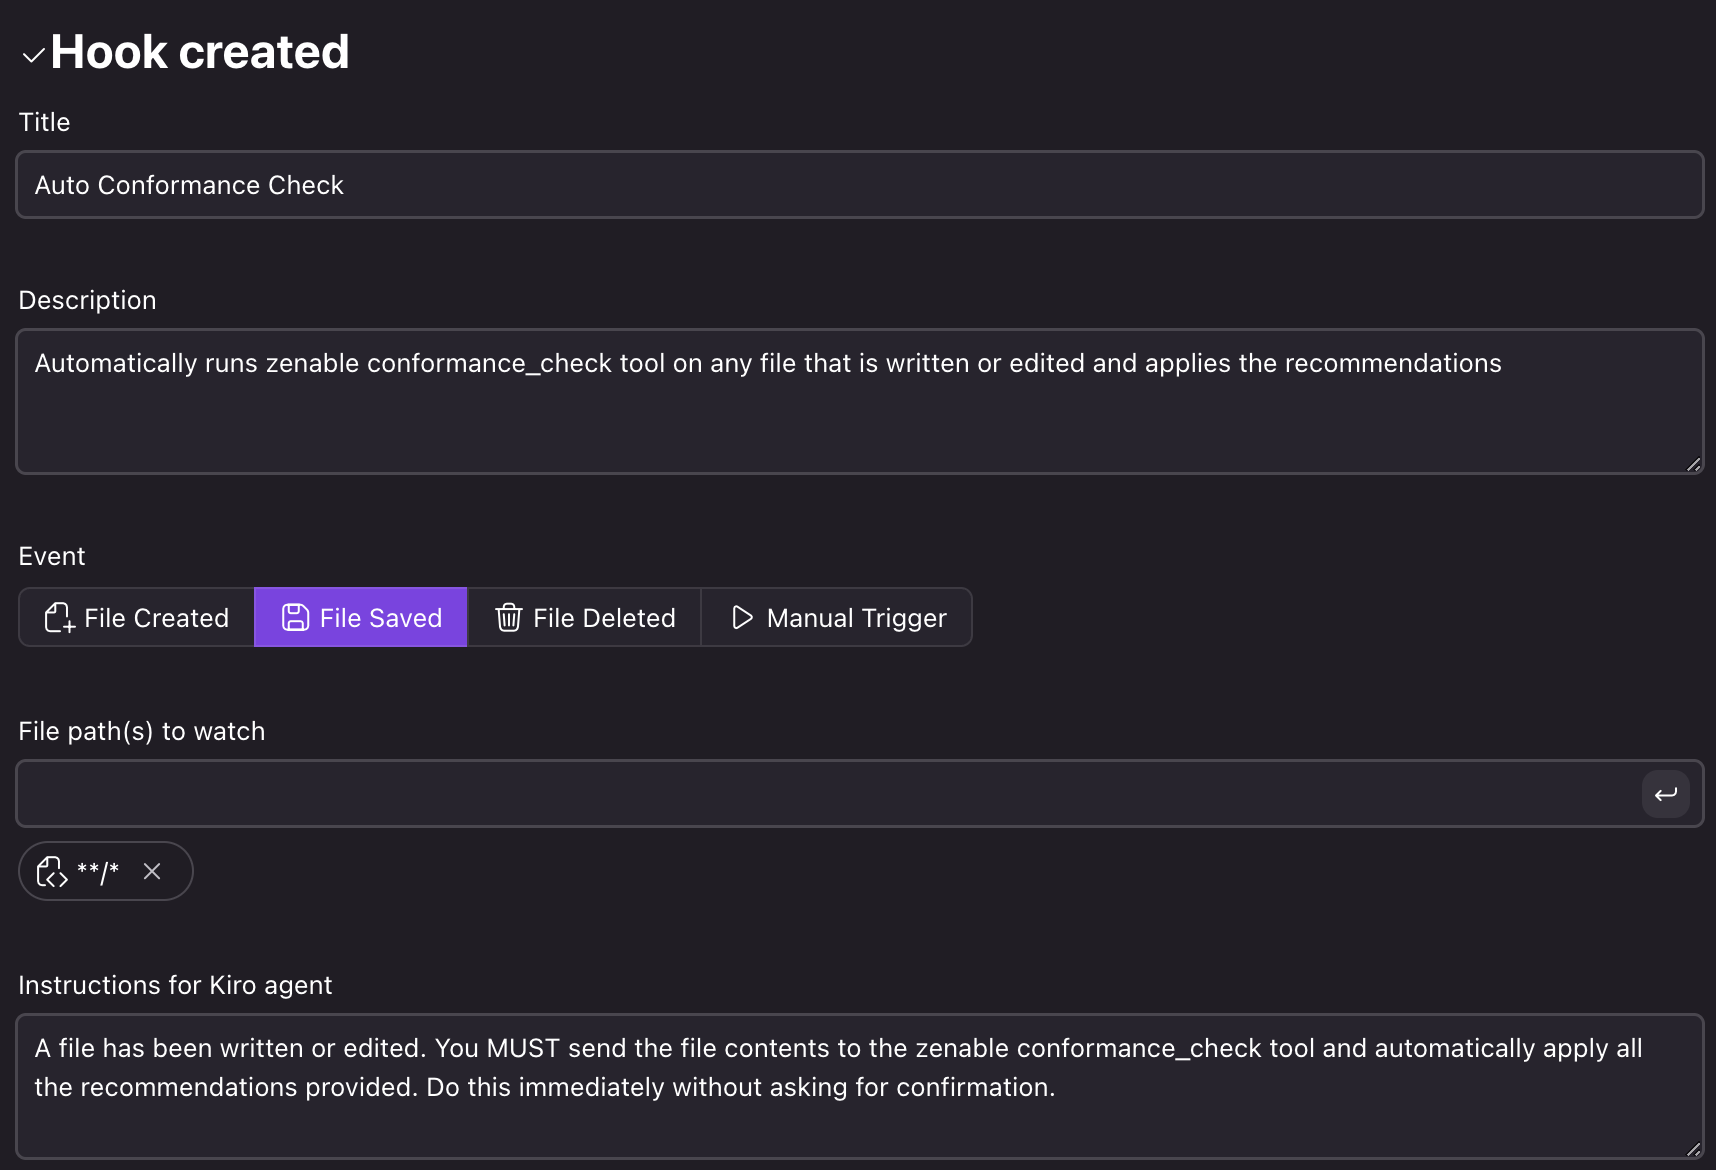
After pressing enter, it should create a hook for you similar to the following:
And in the left panel, underneath “AGENT HOOKS” you should now see something like:

Add this entry to your global ~/.kiro/settings/mcp.json or per-project .kiro/settings/mcp.json configuration file as described in the Kiro
documentation:
Next, add an agent hook by opening the Kiro hook UI and then entering the following into the text area:
After pressing enter, it should create a hook for you similar to the following:
And in the left panel, underneath “AGENT HOOKS” you should now see something like:
Add this entry to your mcp.json configuration file as described in the cursor documentation:
Next, add these user rules to Cursor.
You can add those rules for the current project and share it with your team, using this mdc file
Add this entry to your mcp_config.json configuration file as described in the windsurf documentation:
- After saving, refresh the plugin list or restart Windsurf to detect the new MCP server.
Next, add these rules to Windsurf.
You can add those rules to Windsurf either as a global rule or as a project rule. Read the Windsurf documentation for more details.
These rules work better with at least OpenAI’s GPT-4o, Gemini 2.5, or Claude 3.5. Alternatively, you can manually request that the Zenable tool is called by typing that into the IDE chat.
Add this entry to your global mcp_settings.json or per-project .roo/mcp.json configuration file as described in the Roo Code
documentation:
Next, add a global rule to Roo Code, such as
~/.roo/rules/requirements.md containing the following:
You can also add those rules as workspace rules in the current
project and share it with your team by storing the
following contents inside your repository, under .roo/rules/requirements.md:
For more details on the MCP protocol or advanced configuration, see the official documentation for your IDE.